Overview
The Outreach Agent sends real outreach mail on your behalf. Setting it up cleanly is what protects the deliverability of every other email your business sends — receipts, password resets, newsletters, customer support — and what lets recipients reply to a real person at your team rather than a Sight AI relay address. The agent does two jobs, and they have different domain needs:- Cold outreach (the Outreach tab) — proactively pitching prospects who’ve never heard from you. This is the risky one for deliverability, so it belongs on a dedicated domain, never your main brand domain. It’s the same playbook lemlist and Instantly drill into every user: isolate cold sending so it can’t drag your primary domain down.
- Reply handling (the Agent tab) — answering people who emailed you first: forwarded cold pitches and inbound replies. This is warm, expected mail, so your existing main domain is perfectly fine here. Nobody flags a reply to a conversation they started.
- Register a fresh, dedicated domain just for outreach and create a personal mailbox on it (we recommend Google Workspace).
- Add Mailgun’s DNS records to your domain so we can send authenticated mail.
- Verify the domain in Sight AI (DNS propagation usually takes 5–30 minutes, occasionally a few hours).
- Configure inbox setup in Sight AI so replies land in your real mailbox instead of the Sight AI Inbox.
- Forward a copy of every incoming reply back to Sight AI so the agent can triage and follow up.
Step 1 · Register a new dedicated domain (and create a mailbox)
The first and most important rule: don’t reuse your main brand domain. Cold outreach generates bounces, spam complaints, and unsubscribes at rates your transactional and customer-facing mail never does. Those signals follow the domain — a few weeks of cold sending can quietly poison deliverability for your password resets, receipts, newsletters, and customer support replies. The pattern we recommend is same name, different TLD — a fresh registration that reads like your brand but lives on its own DNS island.-outreach, -mail, or similar suffixes — they read as a marketing domain to recipients and undermine the personal-feeling From line we’re trying to build. Register the domain at any reputable registrar (GoDaddy, Cloudflare, Namecheap, Squarespace Domains, Hover, Name.com — they’re all fine).
Set up email on the new domain (Google Workspace recommended)
Once the domain is registered, set up email on it. Google Workspace ($6/user/month) is what we recommend — it’s the most reliable, gives you a real Gmail-style inbox UI, and the forwarding rule that closes the loop in Step 5 is a single setting. Other options that work fine:- Microsoft 365 — solid alternative; the forwarding setup is a couple more clicks.
- Cloudflare Email Routing (free) — forward-only, no inbox UI of its own. Use this if you only need a forwarding address and have a separate inbox to forward into.
- Zoho Mail (free tier available) — solid budget option.
- Fastmail — paid, well-regarded for deliverability.
john.smith@trysightai.com, not outreach@trysightai.com or hello@trysightai.com. Cold outreach replies far better when the From line reads as a person rather than a sales tool. This same mailbox becomes your Reply-To in Step 4 and the source of the forwarding rule in Step 5, so set it up once and you’ll reuse it across the rest of the flow.
Step 2 · Add Mailgun’s DNS records
In Sight AI, open the Inbox, click Settings in the header, and open the Domain tab to add the dedicated outreach domain you just registered. (You can keep more than one domain in the pool; the agent sends from the single domain you Assign.) Sight AI provisions it in Mailgun and surfaces a table of DNS records you’ll paste into your domain registrar:p=none is monitor-only mode — no legitimate mail is rejected while you’re still dialling things in. Tighten it to p=quarantine or p=reject once your DMARC reports confirm everything legitimate is passing alignment.
Mailgun only provisions SPF and DKIM. DMARC is not generated, not verified, and not enforced by Mailgun, but every major inbox checks it — skipping it is the single most common reason cold outreach from a brand-new domain ends up in spam.
Add the records at your registrar
The fields are universal across registrars even if the UI labels differ. Pick yours:GoDaddy
- Sign in and go to My Products → Domains, then click DNS next to your outreach domain.
- For each Sight AI record, click Add New Record.
- Type = TXT or CNAME (match the row in Sight AI).
- Name = the host part only. GoDaddy splits the host from the domain — for
smtp._domainkey.yourdomain.comentersmtp._domainkey; for the apex SPF record enter@; for_dmarc.yourdomain.comenter_dmarc; for the tracking CNAMEemail.yourdomain.comenteremail. - Value = paste from Sight AI exactly. Don’t add quotes — GoDaddy adds them automatically for TXT records.
- TTL = 1 hour (or default).
- Save.
Cloudflare
- From the Cloudflare dashboard, open the zone for your outreach domain.
- Go to DNS → Records → Add record.
- For each Sight AI record:
- Type = TXT or CNAME.
- Name = the subdomain part. Cloudflare auto-strips the apex — for
smtp._domainkey.yourdomain.comentersmtp._domainkey; for the apex SPF, enter@. - Content / Target = paste from Sight AI verbatim.
- Proxy status = DNS only (the grey cloud, not the orange one). Mailgun’s records must not be proxied.
- TTL = Auto.
- Save.
Namecheap
- Sign in and go to Domain List, then click Manage next to your outreach domain.
- Open the Advanced DNS tab.
- For each Sight AI record, click Add New Record.
- Type = TXT Record or CNAME Record.
- Host = the host part (e.g.
smtp._domainkey,email,_dmarc, or@for apex SPF). - Value = paste from Sight AI.
- TTL = Automatic.
- Click the green checkmark to save each row.
Google Domains / Squarespace Domains
(Google Domains migrated to Squarespace in mid-2024 — same UI underneath.)- Sign in to Squarespace Domains and select your outreach domain.
- Go to DNS → Custom records.
- Click Add record for each row from Sight AI.
- Match the type, host, and value exactly. For host, use the subdomain part only (
smtp._domainkey,email,_dmarc, or@). - Save.
Other providers (Hover, Name.com, Bluehost, DreamHost, AWS Route 53, etc.)
The fields map cleanly across registrars even when the labels differ:- Type — match what Sight AI shows (TXT or CNAME).
- Name / Host / Hostname — the subdomain part. For
smtp._domainkey.<your-domain>usesmtp._domainkey; for the apex SPF use@; for the tracking CNAME useemail; for DMARC use_dmarc. - Value / Target / Points to / Content — copy from Sight AI verbatim.
- TTL — leave default.
smtp._domainkey.trysightai.com); otherwise use the host part only.
Step 3 · Verify the domain in Sight AI
Once the records are in your registrar, head back to Inbox → Settings → Domain and click Verify DNS. Mailgun re-checks DNS and flips each record frompending to ok. Once it verifies, click Assign to make it the domain the agent sends from (a freshly verified domain can be auto-assigned for you).
Step 4 · Configure inbox setup in Sight AI
With the sending domain verified and assigned, open the Inbox tab in Inbox → Settings (the inbox setup card). This is where you tell Sight AI which mailbox you want recipients to reply to, and where you’ll wire the relay back to the agent in Step 5. The card walks through three substeps in order — the in-app instructions are intentionally close to what you see here: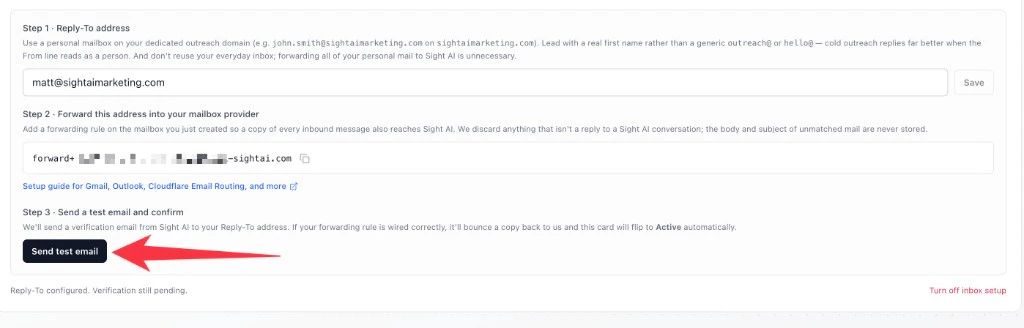
The inbox setup card in the Inbox settings, under the Inbox tab.
Step 1 in the card · Reply-To address
Paste the personal mailbox you created in Step 1 (e.g.john.smith@trysightai.com) into the Reply-To field and click Save. Use the same mailbox you set up in Step 1 — that single address is your Reply-To, your From line, and the source of the forwarding rule in Step 5, so reusing it keeps everything pointed at one place.
The agent doesn’t go live with this Reply-To yet — it’ll keep using the platform Reply-To until verification succeeds in Step 3 of the card so an in-flight setup never silently drops a reply.
Step 2 in the card · Forwarding address
Sight AI displays a forwarding address that looks likeforward+ABC123XYZ@mail-sightai.com. Copy it — you’ll paste it into your mailbox provider as part of Step 5 below.
Step 3 in the card · Send test email
Hold off on clicking Send test email until you’ve finished Step 5 below. Once your forwarding rule is wired up and confirmed, click it and the card will flip to Active automatically as soon as the forwarded copy returns to Sight AI.Step 5 · Set up email forwarding from your mailbox
This is the rule that closes the loop: every incoming message in your outreach mailbox gets forwarded to the Sight AI address you copied in Step 4. Replies still land in your own inbox, and the agent sees a copy. The setup steps differ by mail provider — pick yours.Gmail / Google Workspace
-
Sign in to the dedicated outreach mailbox (e.g.
john.smith@trysightai.com) in Gmail, click the gear icon → See all settings. - Open the Forwarding and POP/IMAP tab.
- Click Add a forwarding address and paste the Sight AI forwarding address from the Inbox setup card.
-
Gmail sends a confirmation email to the Sight AI forwarding address. Sight AI receives it and surfaces it as a new conversation in your Inbox tab — open it and click Confirm forwarding in Google to authorize the forward:
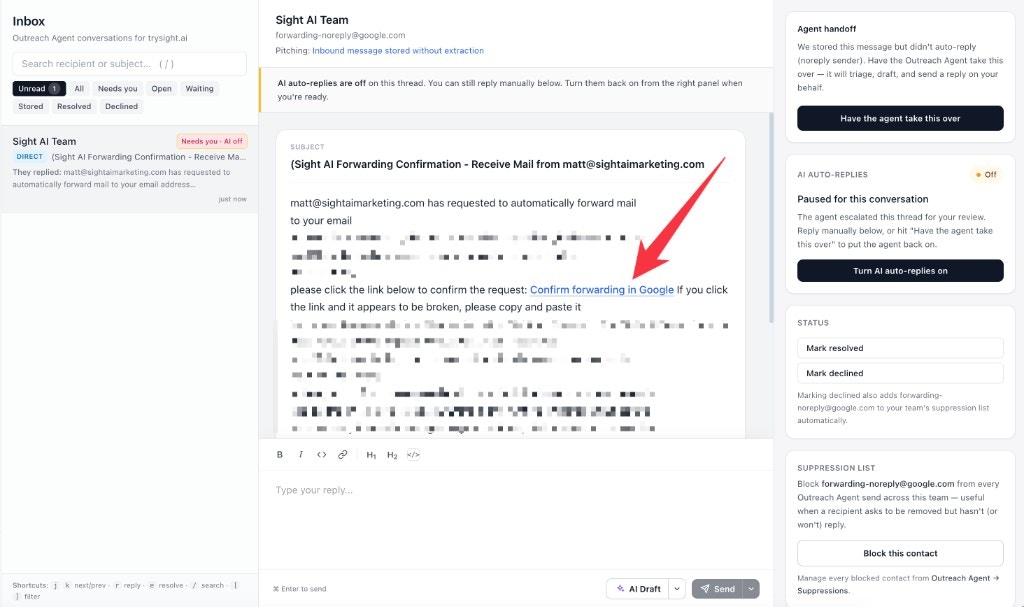
The Gmail confirmation email arrives in your Sight AI Inbox. Click Confirm forwarding in Google to authorize the relay.
-
Back in Gmail’s Forwarding and POP/IMAP tab, choose Forward a copy of incoming mail to and select your Sight AI address. In the second dropdown, pick the keep [your mailbox]‘s copy in the Inbox option (Gmail substitutes your mailbox’s display name into the label) so your original mail stays intact, then click Save Changes:
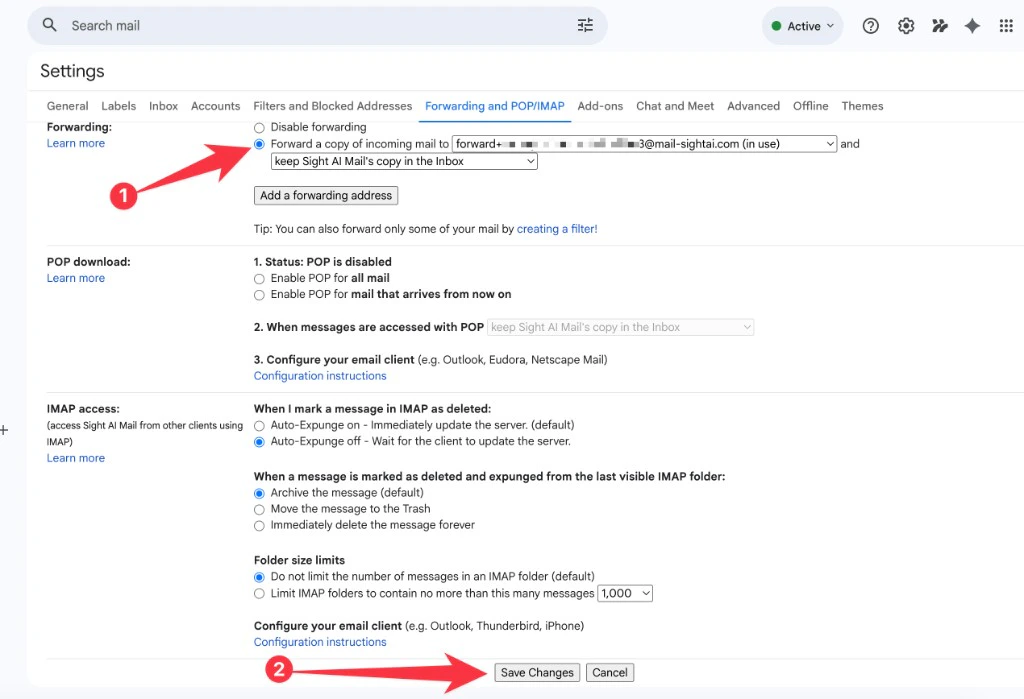
In Gmail, choose Forward a copy of incoming mail to your Sight AI address, keep the local copy in the Inbox, and Save Changes.
- Now jump back to the Inbox setup card in Sight AI and click Send test email. The probe arrives in your outreach mailbox, the forwarding rule sends a copy back to Sight AI, and the card flips to Active automatically.
Microsoft 365 / Outlook
- Sign in to the dedicated outreach mailbox in Outlook on the web and click the gear icon.
- Go to Mail → Forwarding.
- Check Enable forwarding and paste the Sight AI forwarding address from the Inbox setup card.
- Make sure Keep a copy of forwarded messages is checked.
- Click Save.
- Back in Sight AI, click Send test email in the Inbox setup card.
Cloudflare Email Routing (no mailbox required)
If your dedicated outreach domain is on Cloudflare’s free Email Routing:- In Cloudflare, open the zone for your outreach domain (e.g.
trysightai.com, not your main brand domain) and go to Email → Email Routing. - Under Destination addresses, add the Sight AI forwarding address from the Inbox setup card. Cloudflare sends a verification link — open the resulting conversation in your Sight AI Inbox tab and click through to confirm.
- Under Custom addresses, create a route: Custom address = your outreach mailbox address (e.g.
john.smith@trysightai.com) → Action =Send to→ the Sight AI forwarding address. - Back in Sight AI, click Send test email in the Inbox setup card.
Zoho, Fastmail, cPanel, and other providers
Most providers expose a basic forwarder under Email Forwarders, Aliases, or similar:- Source: your outreach mailbox (e.g.
john.smith@trysightai.com) - Destination: the Sight AI forwarding address from the Inbox setup card
- Save, confirm any verification email Sight AI surfaces in your Inbox, then click Send test email in the Inbox setup card.
How replies are detected
Every outbound email the agent sends carries a uniqueMessage-Id header. When someone replies, the reply carries an In-Reply-To header with that same value. The agent uses this header match to know which conversation a forwarded email belongs to.
When inbox setup is active, matched replies are threaded to the existing Sight AI conversation first. Mail that doesn’t match an existing conversation still follows the Email Forwarding intake flow: it can land as a new Inbox thread, and the Auto-handle forwarded and inbound emails setting controls whether the agent triages it automatically or waits for you.
What happens once everything is Active
- Outbound mail uses your Reply-To address. Recipients see
john.smith@trysightai.com(or whichever personal mailbox you chose) and have no way to know Sight AI is in the loop. - Replies land in your own mailbox like normal email.
- The agent sees a copy of those replies via the forward and triages them: drafts a follow-up if appropriate, marks the thread resolved, or flags it for your attention. Everything still appears in the Inbox tab.
- New forwarded or direct inbound mail that isn’t a reply can create a new Inbox thread. If auto-handle is on, the agent triages it before deciding whether to reply; if auto-handle is off, it waits for your review.
Privacy and security
- Matched replies are resolved by headers first. We read
In-Reply-ToandReferencesto identify Sight AI conversations before treating an email as a new inbound thread. - Sender verification. When a forwarded message matches an outbound-initiated conversation, we check that the sender matches the contact enrolled in that conversation. Replies from unrelated addresses are dropped.
- Per-site forwarding address. Each site has its own rotatable forwarding token, so a leaked address never grants access to other sites or other workspaces.
- Team-scoped matching. Forwarded replies can never interact with conversations from other teams.
Troubleshooting
The Inbox setup card doesn’t flip to Active after I click Send test email. Wait a couple of minutes — the probe → forward → relay round-trip is usually under 30 seconds but can take a minute or two on cold mailboxes. Then check, in order:- Did the test email actually arrive in your outreach mailbox? Look in Spam or Promotions too — first emails to a new domain occasionally land there. If it’s not there at all, your sending domain probably hasn’t fully verified yet (re-check Step 3).
- Did your forwarding rule fire? In Gmail, the Forwarding and POP/IMAP page shows your active forward. In Outlook, check Mail → Forwarding. In Cloudflare, check Email → Email Routing → Routes.
- Did you confirm the forward? Gmail and Cloudflare both require a one-time confirmation step (Step 5 above). If you skipped it, the forwarding rule is configured but inactive.
- Confirm the records are exactly what Sight AI shows — case-sensitive, no trailing spaces, no added quotes.
- For TXT records, check that your registrar didn’t double-quote the value (Cloudflare and Namecheap both add quotes automatically; pasting them in yourself produces
""v=spf1 ..."). - For CNAME records, confirm Cloudflare’s proxy is off (grey cloud, not orange).
FAQ
Will my recipients see my Sight AI Reply-To address?
Will my recipients see my Sight AI Reply-To address?
john.smith@trysightai.com) and have no way to know Sight AI is in the loop.What if I skip inbox setup?
What if I skip inbox setup?
Why use a dedicated outreach domain instead of my main one?
Why use a dedicated outreach domain instead of my main one?
trysightai.com if your main is trysight.ai) keeps prospects feeling like they’re talking to your team while keeping the reputation hit isolated. This is the same approach lemlist and Instantly build their whole onboarding around: keep cold sending off your primary domain.Can I just use my main domain if I'm only handling replies?
Can I just use my main domain if I'm only handling replies?
Why a personal name like john.smith@ instead of outreach@ or hello@?
Why a personal name like john.smith@ instead of outreach@ or hello@?
john.smith@trysightai.com looks like a real person at Sight AI sent you a thoughtful note. A reply from outreach@trysightai.com reads as a sales tool — recipients pattern-match it against the dozens of cold mass emails they’ve already deleted today and your reply rate drops accordingly. Use a real personal name (yours or whoever the agent is “speaking as”) for the local-part of both your From line and your Reply-To.Should I use my main inbox or a dedicated mailbox?
Should I use my main inbox or a dedicated mailbox?
john.smith@trysightai.com). The forwarding rule sends a copy of every incoming email to Sight AI. We discard everything that isn’t a Sight AI reply, but you generally don’t want a non-Sight AI service receiving copies of your daily mail. A separate mailbox on the separate outreach domain keeps the privacy surface area minimal.Do I need to pay for Google Workspace just for the outreach mailbox?
Do I need to pay for Google Workspace just for the outreach mailbox?
john.smith@trysightai.com as a forward-only address — you don’t need a paid mailbox seat at all. The downside is you can’t send mail from that address through Cloudflare, but Sight AI handles all sending through your verified outbound domain anyway, so the mailbox is purely for receiving and forwarding replies. If you want to be able to log in and read those replies in a real inbox UI, point Cloudflare’s forward at any existing inbox (your personal Gmail, your team’s shared inbox, etc.). Google Workspace is what we recommend for most teams because the Gmail UI is excellent for actually reading and replying to threads, but Cloudflare is a perfectly valid free alternative.How long does DNS verification take?
How long does DNS verification take?
Does inbox setup affect how my emails are sent?
Does inbox setup affect how my emails are sent?
What happens if the test email doesn't show up?
What happens if the test email doesn't show up?
What if a prospect emails my Reply-To address directly (not as a reply)?
What if a prospect emails my Reply-To address directly (not as a reply)?
In-Reply-To can still become a new Inbox thread through the forwarding intake path. Keep Auto-handle forwarded and inbound emails on if you want the agent to triage those messages automatically, or turn it off if you want direct inbound to wait for review.Can I disable inbox setup later?
Can I disable inbox setup later?
Does Sight AI ever read mail that isn't a reply?
Does Sight AI ever read mail that isn't a reply?
Related
- Outreach Inbox — read, reply to, and triage every conversation, including replies routed back through your real mailbox.
- Outreach Email Forwarding — turn forwarded prospect emails into new opportunities (this is a different feature; inbox setup handles replies).
- Outreach Opportunities — the broader Outreach Agent surface.
- Automations overview — how all the autonomous agents fit together.